Vector3Flash 1.0.3 : Flash Tether USDT and TRON

flash Tether and Tron in trc20 , erc20 network
flash tether and tron on trc20 and erc20 network
The unique and wonderful Vector 3 flash software is more than a flasher with unique features that you will see below. In this version, you have the ability to flash Tether on the TRON network or TRC20, and in the Pro version you will also have the ability to flash on the Ethereum or ERC20 network. In this software, you will be aware of all the steps of creating your transaction and you can see all the activities in the software.
Download Vector3Flash 1.0.3 [STARTER]
Download Vector3Flash 1.0.3 [PRO]
In the following, you will see some features of this version, i.e. Vector 3 Flash Starter.
Wallet synchronization:
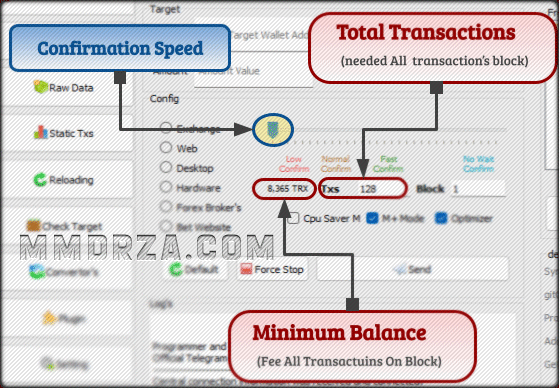
In this version, you need to enter the private key of your Tron wallet (suggested Tron Link wallet). To create your transaction and confirm it, you need to create many transactions in a block created by the central servers, and in this version, I have given you the number and confirmation speed so that you can drag the confirm type in the slider from the config section. And at the bottom of the same slide, in the TXS section, you will see the number of transactions, which is the number of transactions required for the block in which your transaction is, and all fees for those transactions must be paid by a wallet. which has the minimum balance that you see in the software. In the same part where you see the number of transactions, before that you see the amount of Tron required to create that transaction. Like the image 1 (more detail’s)
Some Features Vector3Flash STARTER:
- The basic requirement of syncing with the Tron wallet is only in this version (Pro version is not required)
- Ability to reload all configurations and caches created on the system
- The ability to check and view the profile of the target wallet from the target checking section
- The ability to convert all types of private keys and security words in the software itself
- The ability to choose the type of target address if you know it (to increase speed)
- Ability to flash all forex brokers whose Tether USDT payments are active on the TRC 20 network
- Professional settings in creating blocks and choosing required options
- Ability to configure the signatures of created transactions and personalize them
- The ability to save the settings and use them in subsequent transactions
- and other unique features that I leave to you to experience.
Some Features Vector3Flash PRO:
- Ability to send and flash USDs in group and group
- No need to connect to the wallet to pay the transaction.
- Importing Configuration Settings from RAW Data section
- Visit the transactions sent and its status list in the Static Transaction section
- Ability to raise the main software and core in a fraction of a second.
- Check the status of the target wallet in terms of being active and its inventory
- Ability to convert all kinds of security keys for other wallets
- The plugin section has more than 60 different plugins to flash several different coins at the same time …
- Capability of the original software settings
- Ability to adjust and select Flash and Flash
- Ability to flash wallet wallets and web wallet providers, all forex brokers and all betting sites.
- Adjustment of the configuration speed of each transaction
- Exceptional and powerful CPU Saver MOD Flash at high speed.
- and …
Difference Between Starter & Pro vector3flash versions (Starter Vs. PRO)
After several successful projects in the field of Tether flashing in the Tron network (TRC20), I now decided to provide a complete software in this field that will meet the needs of users at these levels that all their related activities Do it in the same software, and the result of this work is the Vector 3 Flash project. This project is presented in two versions, starter and pro, which are suitable for all people at all financial levels. But, as I explained above, you can see that the facilities and features of each version, one of the most obvious differences can be mentioned in the fee, which in the Pro version, the user does not need to pay it or transfer his own wallet to the software. Connect payment for all transactions. What the user must do in the starter version in order to create a new transaction is to enter the private key of the wallet that has the minimum balance required for all transactions in a block, which can be seen in the configuration section of the software, as shown in the image below and The minimum balance of the wallet that is connected to the software in the starter version must be equal to this number or more so that the user can create his own transaction. I remind you that this value changes with the change of transaction confirmation speed and can be seen in the specified part in the image below.
Now I will teach you how to use the starter version and how to flash with it, and I will explain all its parts in full so that you can familiarize yourself with it. And if you want to order the starter version of Vector3 Flash, you can order now from this Link.
Main network type
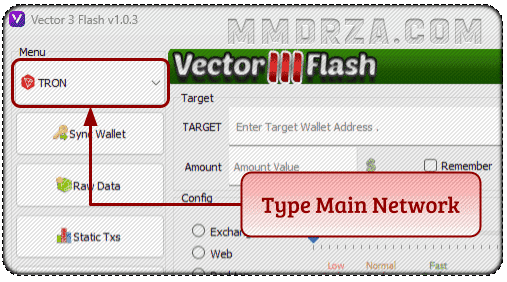
As it is clear in the picture above, you can choose the type of transmission network from this section. Unfortunately, during the decisions made for the starter version, only TRON network or TRC 20 can be used, and because this decision was made in the final stages, it is no longer possible. Removing this section was not ready and it caused confusion in some cases that in the starter version when you click on this option (combo list) to open Tron and Tether TRC 20 and IRC 20 networks are displayed which only In this version, TRC 20 works. If you want to use other networks (all available networks), you must prepare the version of Pro Vector 3 Flash, which you can purchase from this link. In the Pro version, you can flash in the following networks: TRC20, ERC20, PEG-BEP20, ALGO, TEZOS, SOL
Sync Wallet:
The next section, which is at the bottom of the previous section, is the connection with the wallet, which is related to the connection of your wallet through the hacked private key (with 64 characters) with the software and the central server, and all its data is securely encrypted. It changes and in the corresponding window, enter the private key of your Tron wallet (Tron Link is recommended). This connection is for payment of the necessary transactions created in the block in which your transaction is created and to perform your transaction and confirm. It is necessary to have the minimum required balance that can be seen in the config section [image1] of the software, and it must be equal to or more than that in order to create your transaction.
Raw Data:
The next section that is not accessible in the starter version is the raw data section, which can be used in the pro version, and I will explain it in the same section.
Static Transactions:
The next section that is not accessible in the starter version is the Static TXS section, which can be used in the pro version, and I will explain it in the same section.
Reloading:
The next section which is located in the main menu is the reloading section, by clicking on it, all the caches in the config and all the entered data will be deleted and returned to the initial settings. This item is useful when you want to connect another wallet and disconnect the previous one, or you see in consecutive transactions that the decimal of the entered amount is equal to the decimal of the previously entered amount. that you have entered another number, and this time you have to reload the config caches from the central server.
Check Target:
The section for checking the target address, which is clear from its name, is for checking the general status of the target wallet address. Once you have entered the target wallet address and clicked on the set button, you can get some information by pressing this button. View your target address including: wallet balance, status in the network, total number of transactions, total value of transactions performed.
Convertors:
The next part, which is a necessary tool for a user and should always be in your test, is the converters section, by clicking on its button, you will see a new window where you can convert all mnemonics, private keys, decimals, to each other and Convert compressed and uncompressed wallet addresses. (This section is more useful for converting the mnemonic to the hex private key in this software, which is used to connect the wallet)
The next section that is not accessible in the starter version is the plugin section, which can be used in the pro version, and I will explain it in the same section.
Setting:
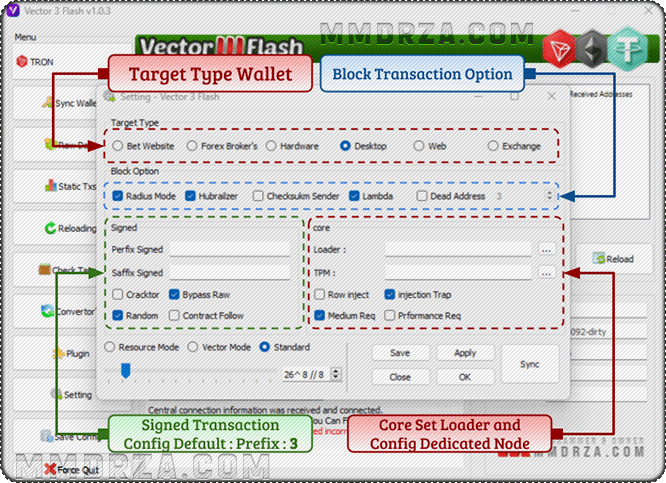
The main part of the user settings of a software is always one of the most used parts of a software and usually in such valuable software its complexity is very high and the user gets confused at first glance and cannot work with it, but in this starter version and Pro version of the software, you will come across a preset section where you can see five different sections like the image above, the first section is related to the type of target which is on the desktop by default and includes sections such as: website It consists of betting sites, forex brokers, hardware, web and exchange platforms, and it shows the address type of your target wallet. If you don’t know your address type, leave it in the same default state.
The next part in the settings section is related to the block settings, which is recommended if you are not familiar with this work, do not tamper with it in any way, because the core of this process and the creation of your transaction depends on this section, and non-standard and non-standard changes It may cause your system to be permanently banned from sending and using this software. The next part is related to the signing of transactions, which has a series of pre-determined items that according to taste, some people may want to determine the first characters of their transaction or the last characters of their transaction and apply the changes as a group. At that time, in this section, you can use only allowed characters four times in the two desired fields. The allowed characters include: 0123456789abcdef and I will write an example for you below:
Prefix Signed: “3a6b” or Saffix Signed(End): “a532” now All Transaction id example This :
- “
3a6b4bd638f69ce2aaa2ec3300039d5de9e34df25a657521e9785faf969fa532“ - “
3a6b84e9c9f98a84bda054361aa72251d12ba31917f2562830b947b5111ea532“ - “
3a6b104ac88184f83536eb87276e3f5b7510fca5a7a186694e95a10b5b37a532“
The next part that you are facing is the core part of the software, which is for those who want to use their own and customized loaders in their own and dedicated nodes, which is better to use the default settings. And finally, as you can see, three modes have been considered for you, which are fully compatible with any type of user in different places, with any type of Internet, which by default is set to standard, which considers all settings as standard for an average system. In this mode, the next mode is vector mode, which is suitable for those who have professional and semi-professional systems, and it is optimized for initial connections and high stability in communication, which is recommended if you have a professional system. But you don’t have a good internet and its stability is not good, I suggest you use the default mode.
How to Send & flashing Tether USDT with vector3flash starter:
Go to the main tutorial of sending, which you will work with this section very continuously and frequently. If you haven’t seen the video related to this version, I suggest you watch it completely and carefully to clearly understand what settings are required to send and create a transaction. However, I will briefly explain it to you in the following, that for the starter and pro versions, most of the cases are similar to each other, except for the cases that I mention in them.
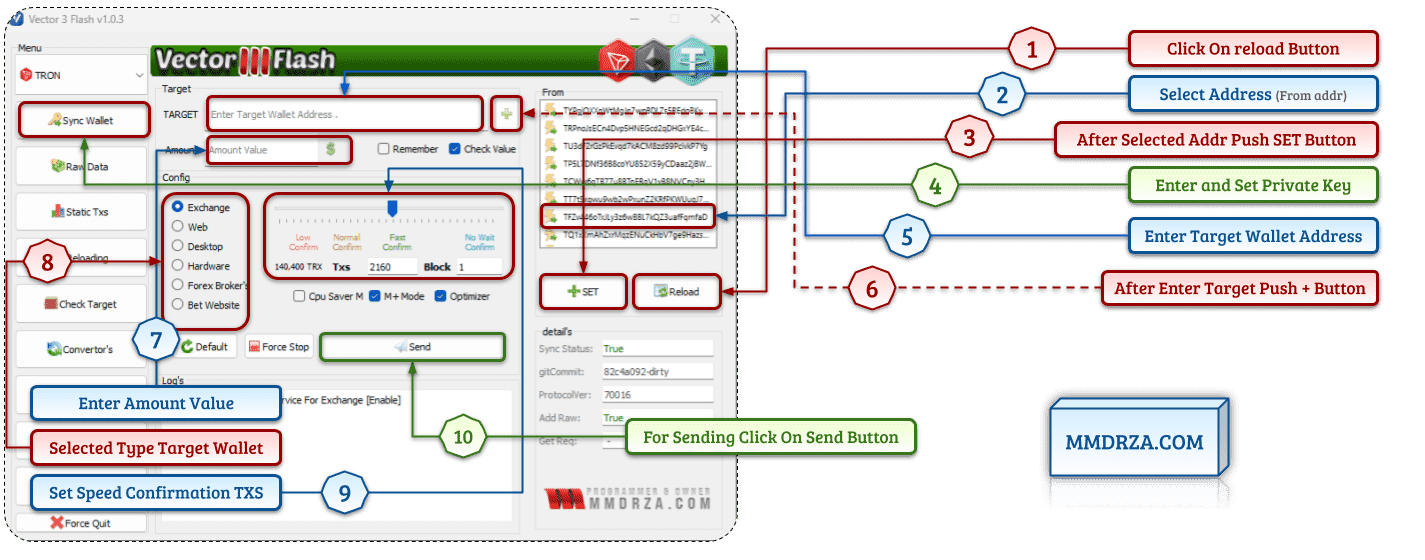
In the image you see above, I clearly explained to you that you want to create a flash transaction, what you should do with the vector3flash starter version, but in the following I will explain a little about how to send in general, so that it is not without grace. The article whose instruction is not included in the text.
First, you can enter your private key and connect your wallet to the software, and you can also click on the reload button to get the set of wallet addresses ready to be sent and flashed. After receiving the addresses, be sure to click on the desired address and to register that address as the sender in the transaction, be sure to press the set button. After you have done this and it has been successfully registered, the sender address of the transaction will be added to the synchronization section. We refer to the wallet, by clicking on it, a new window will open, which has a section for entering the private key of your wallet, in which you must enter the hexed private key of your wallet, which contains 64 characters and consists of the set 0123456789abcdef Is.
Note: Private Key and Sync Wallet:
I would like to remind you that the wallet that you want to connect to the software must have the minimum balance that is displayed in the software, which can be seen in photo number 1. naturally, you will face an increase in the amount of fee required to create a transaction. The faster you do it, the number of transactions increases, the result of which is the increase in the fee required to create all transactions. Why do you have to pay for all transactions? What does it have to do with you?
I have explained in the previous articles, but I will explain again to make this issue clear forever, in the starter version, which costs much less than the pro version, the user needs to pay for the transactions in a block. Why? Because that block is specially and custom made only to create your transaction and validate your transaction and it is not useful for anyone else and all the transactions in it belong to you, but with completely random, hypothetical and variable numbers. So, for these transactions, which are only for validating your block, the payment of them is the responsibility of the creator of the new transaction. Of course, I would like to remind you that this amount of fee is very small compared to the large amount of profit that is generated in front of creating a transaction, and even this amount of fee can be used from the same tethers that we flashed. How? To begin with, we can get the amount of Tron shown in the software in the form of real Tron and put it in our wallet and create the transaction, and after creating the transaction, we can transfer the created Tethers to Tron in any exchange you want. Convert some of it and then always keep those trons somewhere for yourself. I remind you that in the pro version you don’t need to enter the private key and all transaction costs and fees are deducted from the collection of wallets connected to the central server. Also, in the starter version, they have a daily sending limit of $1,000,000, and in the pro version, they have a daily sending limit of up to $10,000,000.

Vector3Flash STARTER Version: 1,000,000 $ [Order]

Vector3Flash PRO Version : 10,000,000 $ [Order]
Vector3Flash PRO:
The professional version of Flash Vector 3 is a version beyond the expectations of users that meets all its needs and the experience you will have of flashing speeds in this release so far as you have not experienced it because all the steps within a few widths. Seconds are done and in less than a few seconds the transaction you created will be confirmed and receives its approval as a real tether.
Below I introduce you to the unique and extraordinary professional set of features, including:
Type Mode :
Select and activate more than 12 different modes in different platforms trc20, erc20, bep20, sol, algo,
Batch Target:
This feature, which is only available in this version, allows the user to collectively flash the wallet into a group and create a transaction from a group.
RAW Data:
This section can be called a special section because you can import your own config with a variety of input and output data and enter the relevant configuration for more transaction and stability. The set of these files, which are 6 files after purchasing in the submitted package created. Examples of the Imported Settings here can be seen in the two images and click on those images to see in the original size[image5: after import & image6 before import]
Static Txs (Transaction Report):
In this section you can see information about all transactions created with Vector 3 Flash. See information such as the ID of transactions and the recipient wallet address or the same purpose and date and date of creating transaction with the number of flash transaction. In the picture above you can see that I clicked on a transaction in this section and the transaction information was displayed for me in the bottom fields [image7].
Plugin:
Add more than 60 different types of plugins to activate different networks and available platforms. In your professional version, with any plugin we provide after purchasing, you can add different networks or you can schedule transactions using Cron Job. You can repeat one amount like a transaction for 100 transactions and you can use a valuable plugin to vote on the Tron Scan to vote as random with different wallets or for one nodes (this is suitable for people. It is ninety and operates in the tronscan). Below you will see the picture of some of these plugins that are included in your email package after the order is registered [image8])
Convertor:
This part of the converter is no different from the starter version and has the same features, but I will still give a brief explanation:
The tool in this section relates to the converting the private key and the security words of the wallet, which is more effective in the starter version, but it was also included in the version so that it has no deficit than the starter version. You can also use it in all relevant tasks.
In order to introduce the rest of the sections, I should point out that it is best to put other important settings by default if you would like to change the settings. For example, between $ 10 and $ 500. More than this amount and value will cause you some disorders that you may be waiting for hours to fix it.
Setting:
You can see the main settings section of the software where you can manipulate and modify some of the default block and method settings and create them according to your own wishes. After purchasing your product in the package you are sent to you will see several different files, all of which have video tutorials and have full descriptions in themselves, but among them there is a folder called the loader with the file extension in it. .bin is that for each file the necessary descriptions and tutorials with it is included in the PDF file with the same file name that I suggest at the end if you have any questions or problems, first the tutorial video about this version at the end See this post and finally, if your problem is not resolved, you can contact my ID in the telegram that is available in the contact section.
Save config:
This section you have applied any settings by pressing this button by default saves a file with a .json extension and upload it every time you open the software to make the configuration and new settings. It loads according to the same settings.
How To Send And Flashing Tether USDT With Vector3Flash PRO:
How to send and flash can be seen in the video I have put at the end because it is fully taught and taught clearly and twice flashing for you to see how repeat and send how much It is easy . In this version that apparently there is no difference with the starter version of how to send it, but only in the post because you get a lot of features that are not available in the Starter version. The same is not the need to enter the specific key of the wallet that you need no specific key in the professional version of Vector 3 Flash and you only enter and send the target address, but the items I would like to summarize in summary how to flash a one The address is the TRC 20, which starts with the big T -letter. First, when we open the software, we first press the Reload button in the right part of the software in the FROM section, which after clicking on it all the ready -to -flashing addresses will appear in the top of the same button. These addresses are used as the sender in your transaction and are included in the transaction as the sender. After selecting one of them and clicking on it, click on the set button so that the address is included as the sender in the transaction settings. After this step, it’s time to enter the target address. If you don’t want to send in bulk and want to flash a single target, enter the address in the target field and press the + button next to it so that it is registered in the transaction settings and after that In the next section, you can enter the transaction amount or transaction value, which in the professional version, you can enter this number up to $10 million per transaction and throughout the day.
In the next step, there is the configuration section, at the beginning of which you have to select the wallet type of the target address from among the available options. If you do not know the type of target wallet, do not choose any of them, but choosing this item will increase the creation of transactions in the final stage.
In the next step, you will see the transaction confirmation speed settings slider, at the bottom of which you will see the number of transactions in the block that you will make with this transaction. The more you drag the slider to the right, the more transactions will increase. Your transaction, which is blocked, will be confirmed much faster.
The next item that is suitable for your computer, if you are using a professional system and have at least 12 CPU cores, you can activate the CPU SAVER MOD option to enjoy the high speed of transaction creation. And finally, after doing all the mentioned things, click on the send button and wait for your transaction to be created after the block is created and the transactions are inserted into it. After pressing the send button, in a new window that opens, you can see the number of transactions that are being added to your block, and at the end of it, when you complete the transaction successfully, you will see a picture like the one below [image9]. You will see your transaction ID and the address of the sender and receiver (target) and the amount sent, and when you see this window, it means that the requested number of Tether has been sent to your target address and is now available, just wait a few seconds until The transaction is fully confirmed.
ERROR:
In the following, I will introduce you to the set of errors in this program, i.e. Vector3Flash, and I will teach you how to fix each of them.
Most of the errors are common in the starter version, which I will solve here because in the Peruvian version, there is a less error that can only be the target address error so that the user is wrong and the distance or incorrectly enters and here. Take a set of Starter and Pro sets:

If you are using the starter version and you have this error [image10], you want to use features in your software that does not belong to the starter version and only the professional version can use this service and if you want to fix it and fix it. Must buy a professional version
As you make any error, if the message comes and the message comes in, the same message is clearly explained about the error that I will continue to deal with another error that occurs if the address does not enter the address (target wallet address)[image 11]. . In this error you did not enter or entered the target address. Maybe you have not pressured the + button to register in the Configuration of the program for your transaction, which will be re -examined (most users will press the + button next to the target address. That’s why it remains empty in the target address settings and this error appears.)
video : Screen Record from vector3flash starter:
tutorial vector3flash starter version and flashing tether usdt to target wallet.
video Screen Record from vector3flash Pro version:
use and tutorial with send and flashing 2 target wallet , 2,300,000 $ and 3,000,000 $

